

I know that Cutiefly hasn't been introduced to Pokemon Go yet, but with this little keychain you can still go with him! The moment I saw Cutiefly in Pokemon Sun, I fell in love. I think it might be my favourite Pokemon from Alola!
This keychain measures about 2" (5 cm) in every direction: height, length, width. It's very small, just like Cutiefly is in the game! It's also very popular with my roommate's cat. He keeps stealing it off my shelf.
The pattern here is free, but if you'd rather have a printable version or if you'd like to throw a little support my way, I have a printable PDF available on Ravelry for the tiny sum of a single loonie!
Here's some quick guff on the ways you can use my pattern:
- do not redistribute the pattern - just link to this page
- your results are free for personal use - but I ask that you don't sell your finished product. just hand them out as gifts, ok? your friends will love you for it
With that out of the way, on to the pattern!
ad
Materials

- Size E (3.5mm) Crochet Hook
- Worsted Weight Yarn
- I used Red Heart Super Saver in:
- Soft White
- Cornmeal
- Warm Brown
- Black
- I used Red Heart Super Saver in:
- Yarn Needle
- Stuffing
- Keychain
Abbreviations
- ch – chain
- sc – single crochet
- hdc – half double crochet
- inc – two single crochet in same stitch
- sc2tog – single crochet two together
- dec – invisible decrease
- ss – slip stitch
- flo – front loop only
Techniques
I have a useful guide on all the different techniques I use when I make amigurumi. Obviously, you should stick with whatever techniques you are comfortable with when making amigurumi, but I still recommend checking it out if you wanna get a result as close to mine as possible!
This pattern will ask you to work invisible decreases while working in BLO. To do this, work the invisible decrease the same as your would regularly, but use the back loop instead of the front loop.
Body
Starting with white (Red Heart Super Saver Soft White).
Rnd 1: ch 3, sc in 2nd ch from hook. 3 sc in next, rotate to back of ch, 2 sc. (TINY SEAM: ss to first sc, sc ONLY when starting next round). (6 sc)
Rnd 2: inc in each of next 4 sts. In the next st, we’ll be doing a slightly-modified loop stitch.
 |
 |
| Pull up some yarn then yarn over behind, pulling through the stitch. This creates a loop. | The loop should be about 1 inch tall (2.5 cm), but you can just eyeball it. |
 |
 |
| Remove your hook, then push the long loop forward through the two loops of the stitch. | Re-insert your hook in the two stitch loops, yarn over, and pull through. |
To continue with the round: repeat this process in the same stitch to create another loop stitch. Now you have Cutiefly’s two antennae.

Finish the round: inc in the next stitch. (12 sc)
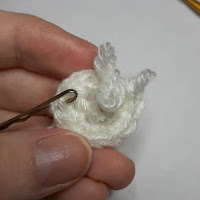
Using round beginning colour change, cc to yellow. Make sure the keychain is threaded on the yellow yarn for use later. Like so:

Rnd 3: (sc, inc) around. (18 sc)
Rnd 4: sc around. (18 sc)
Rnd 5: sc 13. then in the next stitch, work a sc until you have two loops on your hook (after you’ve yarned over and pulled through the stitch).

Then yarn over, grabbing the yarn on the other side of the keychain. Pull through to finish the sc, now with the keychain embedded in it.
 |
 |
Rnd 6: sc around. (18 sc) cc to white using round beginning colour change.
Rnd 7: sc around. (18 sc)
Rnd 8: (sc, dec) around. (12 sc)
Rnd 9: sc around. (12 sc)
Stuff the body.
Rnd 10: Working in FLO: ch 3, ss to first st. (ss to next, ch 3, ss to same) around. ss to the approximation of the first stitch, as it can be hard to tell where the first stitch is.
Rnd 11: Working in the BLO of the last row (the loops that we skipped): dec around. (6 sc)
Fasten off, leaving a long enough tail for a Weaving Finish. You can add some extra stuffing before fully sealing up if you feel the need.

Wings
Starting in white. Make 2.
Row 1: ch 5, sc in 2nd ch from hook. sc 3. (4 sc)
Row 2: ch 1, turn. sc, hdc 2, sc, cc to brown. (4 sts)
Row 3: ch 1, turn. sc2tog twice. cc to white. (2 sc)
Row 4: ch 1, turn. sc2tog. (1 sc)
Fasten off, leaving a long enough tail to sew on the body later.

Nose
Join brown yarn to the middle of the white face portion, like so:

ch 3. sc in 2nd ch, sc in last. ss to where you joined the yarn. Fasten off and hide the tail in the body.

ad
Attaching Wings
Mark the row after the keychain, one stitch on eiter side.

 |
 |
| Insert your needle above the row. Pull through and sew through the single sc of the wing to fasten. | Insert your needle below the marker. Pull through and sew through the same single sc on the wing. Tie a knot and hide the end. |
Embroidering Eyes

The top of the eyes will be placed one stitch away from the antennae. The eye will be three stitches tall, leaving two stitches at the bottom between them.
Attaching Legs
Make 2 legs. Cut a 4” (about 10 cm) length of black yarn. On one end, tie a double overhand stopper knot. It’s fairly simple once you learn how to do it. There’s a simple photo step-by-step guide at www.animatedknots.com/double-overhand-stopper-knot. Trim off any excess after the knot.
Thread the un-knotted end through your yarn needle and attach using this placement. Basically, in the second row of yellow, entering in line with one eye and exiting in line with the other (behind two stitches). Like so:

Then do another double overhand stopper knot at the other end of the yarn, trimming any excess.
With the second piece of yarn, tie a double overhand stopper knot on one end. Thread the un-knotted end though your yarn needle and attach on the last row of yellow, in line with the other legs. Like so:

Tie another double overhand stopper knot on the end.
And you're done!

I hope you enjoyed making your Cutiefly keychain! If you want another keychain to keep him company, you can check out my Drifloon pattern here! If you want to check out my other Pokemon patterns, I have a tag for all of them. Or you could check out all my free patterns.

No comments:
Post a Comment
This is a family friendly website, so please ensure that your comments are free from vulgar or hateful language. I reserve the right to remove comments at my discretion.
Learn about how your personal information is used when commenting here.