

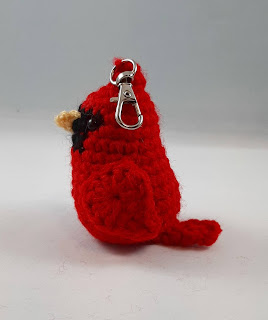
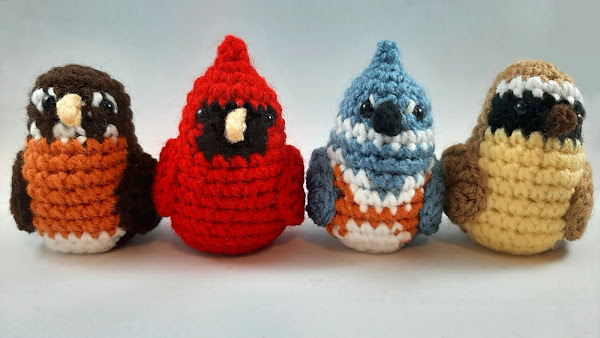
On Instagram, a group of amigurumi designers came together to create a contest called #amigurumishowcase. I decided to enter with some kind of small bird. This cardinal was the first of three designs I made for the contest! Once I made the cardinal I decided that I wanted a bird with a bit more colour variety to it. Then I made a Common Yellowthroat. And then I saw a Belted Kingfisher and decided that I had to make that too! In the end I could only enter one so I chose the kingfisher. I'll definitely be posting that pattern one day, but for now we're starting with the first design, the Northern Cardinal!
Technically, Northern Cardinals aren't really an Albertan bird. They live in the eastern side of the US and Mexico. But they've slowly been making inroads into Alberta! Most of the sightings have been in the southern part of Alberta, though there's been reports in the Edmonton area.
This little guy stands about 3.5" (~9 cm) tall excluding the keychain and is 2.75" (~7 cm) wide from belly to tailtip. I made both a keychain and non-keychain version. The only difference is whether you attach the keychain at the start.
You can buy a PDF copy of this pattern in a little ebook here on Ravelry! The book contains eight patterns: four coasters and four amigurumi keychains (including this one). It's the exact same pattern as you'll see here, but I bundled them up for $5 CAD to provide an easier-to-print PDF or for if you wanted to show me some support.
Here's some quick guff on the ways you can use my pattern:
- do not redistribute the pattern - just link to this page
- your results are free for personal use - but I ask that you don't sell your finished product. just hand them out as gifts, ok? your friends will love you for it
With that out of the way, on to the pattern!
ad
Materials
- Size E (3.5mm) Crochet Hook
- Worsted Weight Yarn
- I used Red Heart Super Saver in:
- Cherry Red
- Black
- Cornmeal
- I used Red Heart Super Saver in:
- Yarn Needle
- Stuffing
- Keychain (optional)
- 2 6mm safety eyes
Abbreviations
- ch – chain
- sc – single crochet
- hdc - half double crochet
- dc – double crochet
- sc2tog - sc 2 together
- inc – two single crochet in same stitch
- dec – invisible decrease
- ss – slip stitch
- cc – colour change
- blo – back loop only
Techniques
I have a useful guide on all the different techniques I use when I make amigurumi. Obviously, you should stick with whatever techniques you are comfortable with when making amigurumi, but I still recommend checking it out if you wanna get a result as close to mine as possible!
This pattern will ask you to work invisible decreases while working in BLO. To do this, work the invisible decrease the same as your would regularly, but use the back loop instead of the front loop.
This pattern is worked in a spiral. Therefore, there are no joins at the end of rounds.
Body
Using red. (Red Heart Super Saver Cherry Red).
To start off, you'll have to choose whether you want a keychain or not. Here's how to attach the keychain as you're crocheting. If you'd like to make a cardinal without a keychain, simply sc 3 in magic ring.
 |
 |
| Thread the keychain onto your yarn. Ignore it for now as you work. | Create a magic circle and sc 1 in it. |
 |
 |
| Push the keychain up until it's flush against the sc you just made. | Working over the keychain, sc 1. |
 |
 |
| Now you have an sc with the keychain embedded in it. | Make one more sc in the circle and tighten. We'll be working in a spiral, so do not join to first. |
And that was round one of the amigurumi! If you don’t want to make a keychain, you can simply do 3 sc in a magic circle. Now continue on with the amigurumi.
Rnd 2: sc, inc, sc. (4 sc)
Rnd 3: sc, inc 2, sc. (6 sc)
Rnd 4: inc around. (12 sc)
Rnd 5: (sc, inc) around. (18 sc)
Use a tiny bit of stuffing to stuff the crest. You might need something like a pen or the end of your crochet hook to force it in there.
Now we’ll start on the face mask.
Rnd 6: sc 6, cc to black, sc 6, cc to red, sc 6. (18 sc)
Rnd 7-8 (x2): sc 7, cc to black, sc 4, cc to red and drop black, sc 7. (18 sc)
Now we’ll start on rounding the back to create that classic bird shape.
Rnd 9: sc 2, inc, sc 12, inc, sc 2. (20 sc)
Rnd 10: sc 3, inc, sc 12, inc, sc 3. (22 sc)
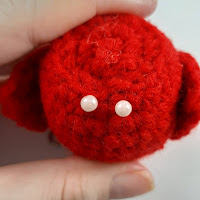
Now we’ll take this opportunity to attach the safety eyes and stuff the head. Use this placement for the eyes:
 |
 |
Basically, use the space between the first and second row of black, along the edge of the small black section.
Now stuff the head. I like to place some stuffing above the posts of the safety eyes then add more stuffing underneath.
Rnd 11: sc 4, inc, sc 12, inc, sc 4. (24 sc)
Rnd 12-15 (x4): sc around. (24 sc)
Rnd 16: (sc 2, dec) around. (18 sc)
Start stuffing the body.
Rnd 17: BLO: (sc, dec) around. (12 sc)
Finish stuffing the body.
Rnd 18: dec around. (6 sc)
Fasten off and do a weaving finish.

ad
Wings
Make 2. In red.
ch 5. ss in 2nd. sc. hdc. 9 dc in last. Now you will work along the back of the chains. hdc. sc. ss in last.
Fasten off, leaving a tail for sewing.
Now we’ll bring the tail up in preparation for sewing.
 |
 |
| Working along the wrong side of the wing, bring the tail up to the 2nd dc. For one wing, work in the same direction as the stitches and work in the opposite direction for the other. | Bring the tail to the front of the wing through the 2nd dc. |
Attaching the Wings
Attach the wings using the 3rd to 7th dc, basically 5 stitches. Use the placement as follows:
 |
The farthest point will be three stitches away from the longest edge of the black mask, one row below the end of the mask. The next point is one stitch inwards towards the belly. The next point is one diagonal stitch down and inwards. The next is also one stitch diagonal and inwards. The next is one row below. The final point is one stitch diagonal and down towards the back. You’ll be sewing following the arrows. Enter into the 3rd dc to start sewing. |
 |
After sewing to the final point, enter the 8th dc and make a knot along the next stitch towards the back. |
Tail
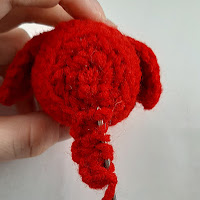
Mark 2 stitches along the BLO round that are roughly in line with the crest. Depending on how twisted your seam is, this could be 2 stitches after the seam or 1 stitch on either side of the seam. Like so:
Attach red yarn to the first stitch, working in whatever direction is most comfortable for you. ch 1, sc in that stitch. sc in the next stitch. This is the first row of the tail.
Row 2-5 (x4): ch 1, turn. sc 2. (2 sc)
Row 6: ch 1, turn. sc2tog. (1 sc)
Fasten off. Hide the yarn tail along the edge of the tail towards the body. Tie a knot in one of the stitches of the body, then hide the tail in the body.
Beak
You’ll be attaching the yellow yarn in the middle of the black mask, working under the 2nd row of black. This will be after the 2nd stitch away from each eye. Insert your hook from the bottom to the top. Like so:
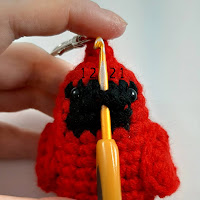
dc in this stitch, then fasten off.
 |
 |
Hide the tail from attaching into the body. Hide the tail from fastening off along the top of the beak and into the body. If you pull the tail too tightly, the beak will get smushed. Pull on the beak until you get the desired shape, then trim the tail.
And you're done!
I hope you'll enjoy your little cardinal buddy! I have some other bird-themed patterns if you'd like to check those out! Or you could see all of my patterns here.
Happy birdwatching!
The cardinal is my favorite, it is just so perfect! Yes, they are all really cute but that little crest, ooohhhhhh!
ReplyDeleteI am so thankful I found this pattern! Thank you for sharing with the world. :) I have gotten the body down but struggling with the wing. Do you have any instruction or tips on the hdc and dc? I am new to crocheting.
ReplyDeleteHello, and welcome to the world of crochet! I'm glad you like my pattern so far! When I was first starting out, I found this video series by Crochet Guru really helpful, as she very slowly goes through each stitch: https://www.youtube.com/watch?v=3do-GdT_8Nc&list=PLFA988387638DC7FE
DeleteHere's the video in the series on double crochet: https://www.youtube.com/watch?v=5xKssKskNzo
and the one on half-double crochet: https://www.youtube.com/watch?v=QnOYlwGN5cI&list=PLFA988387638DC7FE&index=11
For some more amigurumi-centric tips, PlanetJune has probably the most comprehensive set of tutorials on the internet! https://www.planetjune.com/blog/tutorials/crochet-tutorials/
I hope those links help! Thanks for using my pattern, and let me know if you have any other questions!
I love this pattern! I'm just having a little trouble getting the tail correct. Would you be able to help with this. Is there a video to show how to do it.
ReplyDeleteHello there! I don't have a video specific to me making this pattern, but here's some resources:
DeleteThis video shows how you would attach to the cardinal's body to start the tail: https://youtu.be/Lpxy_MrFo5k?t=72
For the tail itself, you would proceed as if you were doing regular crochet, not amigurumi. Basically, doing two single crochets, ch 1, then flipping the project over, then 2 more sc. Here's a video: https://youtu.be/aAxGTnVNJiE?t=323
I redid it a couple times and went down from 4 to 3.5 hook and pulled the chain 1s tighter.
DeleteThank you so much for this beautiful pattern! I've just finished one that I'm going to leave in town as a random act of crochet kindness!
ReplyDeleteThat's awesome! I'm glad you enjoyed the pattern!
DeleteI’m going to make this little birdie for an ornament exchange. What do you think the best way to hang it would be?
ReplyDeleteHello! When I've made them as ornaments in the past, I've just attached a length of yarn into the crest to make a loop. If you want something a bit fancier, you could just make a length of chains with a long end on both sides to attach.
DeleteThank you for this! While I've been with my parents helping as my daddy navigates his end of life, I've also been delighting with my mom as she's watched birds come to her feeders during the snow. We have especially enjoyed the Northern Cardinals, so this has allowed me to make her something that can remind us both of this precious time
ReplyDelete