

This is a post I link in every amigurumi pattern I post because it gives a rundown of all the basics I use. Obviously you can follow your own methods when following my patterns, but these are the techniques I used when creating them, so if you want your result to be as close to mine at possible, I'd recommend following along!
Navigation
Magic Circle
Tiny Seam
Invisible Decrease
Colour Change Round Beginning
Colour Change Mid-Row/Round
Invisible Finish and Colour Change
Weaving Finish
Hiding the Ends
Attaching the Parts
Attaching Details
Embroidery
French Knots
Magic Circle
The magic circle is the most essential technique for amigurumi. It's the first thing you do when starting a project. Because it's so important and ubiquitous, there's a lot of resources on how to do it. Here's my favourite: MJ Carlos's video on how to start a magic ring and how to do the first few single crochets in it. I'd highly recommend the video, seeing it in action really is the best way to learn! But here's a quick step-by-step for your convenience.
 |
 |
 |
 |
 |
 |
 |
Tiny Seam
I just hate the sight of seams in amigurumi. But, at the same time, crocheting in a spiral really messes with my ability to use colours in the pattern. So, here's a solution I came up with.
At the end of the round, slip stitch to the first stitch of the row. Instead of doing (ch 1, sc), only use a sc. This keeps the round relatively even without leaving a bumpy seam. You can still see the seam if you look for it, but I find that it doesn't stick out as much as a ch1, sc seam.
 |
 |
| Seam using only slip stitch + sc. | Seam with slip stitch + ch 1, sc. |
Both of the examples are crocheted using Red Heart Super Saver yarn, both in the colour Delft Blue. It's hard to tell from the picture, but the seam using (ch1, sc) is raised slightly, giving it a bumpy appearance. I much prefer skipping the ch 1, but using my patterns with (ch 1, sc) won't really change anything, so feel free to use whatever is more comfortable for you!
Invisible Decrease
This isn't a trick I came up with, but it's pretty essential for amigurumi. Rather than doing sc2tog in amigurumi, the invisible decrease helps hide the decrease, making them less bulgy and giving your amigurumi a smoother, rounder finish. Rather than re-explain it here, take a look at All About Ami's guide (with pictures)! If a video is more helpful for you, check out June Gilbank of Planet June's video tutorial.
I use BLO rounds in my patterns sometimes but still require invisible decreases during those rounds. In that case, rather than using the front loop to do the decrease, I use the back loops.
Here's a quick step-by-step of my own:
 |
 |
| Insert your hook into the front loop of the first stitch. | Insert your hook into the front loop of the second stitch. |
 |
 |
| Yarn over and pull through the stitch loops, leaving two loops on hook. | Yarn over and pull through both loops. |
Colour Change at Round Beginning
Here's a way to change yarn colour at the beginning of a round courtesy of Crochet Dreamz.
 |
 |
| Slip stitch into the first stitch like usual. | Yarn over with the new colour... |
 |
 |
| ...and pull through | Pull the end of the old colour until the loop practically disappears. Continue with the pattern as written. |
Colour Change Mid-Row/Round
When you need to change your yarn colour in the middle of a row or round, here's how to to do it:
 |
 |
| Progress through the stitch before the colour change until you reach the last yarn over. If you are working a single crochet, that means you enter the stitch and yarn over with the original colour, then stop. | Yarn over with the new colour and pull through. |
 |
|
| Now you can continue using the new colour. |
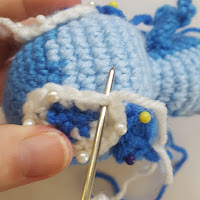
Invisible Finish and Colour Change
If you decide to work your amigurumi in a spiral without joining after each round, then there's the unique challenge of making seamless stripes of colour. This is a technique I stumbled across on Ahooka’migurumi's blog while I was trying to solve this problem. I followed her technique almost to the letter with the exception of the last step, where I chose to attach the new colour at a different point in the amigurumi instead of back into the first stitch of the round.
She has a pair of videos on the technique here but here's a quick photo tutorial rundown:
 |
 |
| Rather than finishing off as normal, cut your yarn then pull up on the loop until the end is pulled through. | Thread the tail into your needle, then enter the second stitch of the round from front to back. |
 |
 |
| Then insert your needle into the back loop of the last stitch of the round from front to back. | Now you have a seamless join with a fake stitch over the first stitch of the round (marked here by the bobby pin). |
 |
|
| To help disguise the change even further, I like to attach the new colour at a different point along the round. |
Continue with the next round as normal. You'll work into the false stitch like it's a normal stitch.
Weaving Finish
This is a trick I learned from watching BeetleAtBay's Twitch stream. I dunno how popular of a technique it is, but I figured because I learnt it from her and I like her streams, I might as well provide that link.
Unfortunately I don't actually have a clip of her explaining it, so you'll have to put up with my explanation.
This is done after finishing your amigurumi and fastening off. You'll need to leave a tail for this. Insert your needle into the front loop only of the first two stitches, then pull through. Then do the same for the next two stitches, continuing until you've done this all around.
This leaves a bit of a puckered "bellybutton." To get rid of this, insert your needle into the middle, pushing through the stuffing of your amigurumi until you come out at some other point in the amigurumi. Tie a knot around a stitch at this place, then hide the end by going back into the amigurumi and cutting off when you come back out.
Here's some photos on how to do it:
 |
 |
| Cut your yarn, then yarn over and pull through completely to make a knot. | Thread the yarn through your needle, then enter the front loops of the first two stitches. |
 |
 |
| Pull tight. | Repeat around. You will be left with a "pucker" |
 |
 |
| Insert your needle into the middle of the pucker, exiting at some other point. | Pull tight until the pucker disappears. |
Hiding the Ends
Hiding the ends in amigurumi is a lot easier than in 2D pieces. Basically, after making the weaving finish, tie a knot over the stitch you exited by, insert the needle back into the amigurumi and exit, then trim the yarn close to where you exited.
 |
 |
| Tie a knot over where the stitch you exited from the weaving finish. | Exit at some other point in the amigurumi, pushing through stuffing. |
 |
 |
| Cut the yarn close to the amigurumi. If any end sticks out, you can push it in with the end of your yarn needle or squish the amigurumi a bit to pull it in. | If where you tied the knot is sunken in, prop it back up by sliding your yarn needle underneath it. |
Attaching Amigurumi Parts
Attaching different parts to amigurumi is usually pretty daunting to me. The technique itself, the whipstitch, is pretty simple, but how and where you attach the amigurumi parts really matters. Just take it slowly and carefully. Mark everywhere the parts will be attached before sewing everything on so you can make sure everything's lined up and even. Here's a simple guide from Shiny Happy World, which includes a video as well. I also made a little photo guide for reference.
 |
 |
| Mark where the parts will be placed. | Insert your needle into the first stitch of the part. |
 |
 |
| Insert your needle into the start of where you're attaching the part. | Pull the yarn until the part meets the body. |
 |
 |
| Insert your needle into the next stitch on the part. | Insert your needle into the next stitch on the body. |
 |
|
| Pull tight, then repeat around. |
Attaching Details
Kara of K Hook Creations has a very good technique for attaching details to amigurumi. As an excellent added bonus, her little video on how to do it features her adorable Butterfree pokebean! She has lots of cute and nerdy patterns for free on her website, so be sure to check those out after watching the how-to video.
Here's a quick step-by-step photo guide of her technique:
 |
 |
| Insert your needle into the front of the first stitch of your detail. | Insert your needle through a stitch on the body. |
 |
 |
| Insert your needle into the back of the same stitch on the detail. | Insert your needle into the front of the next stitch, then repeat the process around. |
Embroidering
Embroidering used to be one of the steps in amigurumi that scared me the most - mostly because I didn't understand it whatsoever. It's something that seems simple at first, but if you go at it blind without planning ahead, you'll quickly mess up. Understanding the basics of embroidery is essential. Sugaridoo's video on amigurumi details covers embroidery AND attaching details the same way as K Hook Creations. It's an excellent video that thoroughly explains every step, so it's definitely worth a watch.
As always, here's a quick photo guide as a refresher:
 |
 |
| Mark where the lines of your embroidery will start and end. | Insert a needle threaded with a long piece of yarn into the amigurumi. |
 |
 |
| Exit the amigurumi and pull until the yarn disappears into it. | Insert your needle into the same stitch you exited from, and repeat the last couple steps 1-2 more times in different positions to keep the end fastened. |
 |
 |
| After hiding the end, come out at the start of the first line of embroidery. | Insert your needle where the first line will end... |
 |
 |
| ...and exit where the next line will end. | Pull until the line is straight, but not so tight that it warps the amigurumi. |
 |
 |
| Insert your needle where the current line starts/previous line ends... | ...and exit where the next line ends. |
 |
 |
| Pull to create the line. | repeat the previous steps until you're done with the embroidery, this time exiting at some other point in the amigurumi |
 |
|
| Pull to create the line, then repeat the first couple steps to hide the end. |
French Knots
French knots are a technique used in embroidery to create small round points. You can use them in crochet for the same effect. For example, in my wiggler pattern, I use french knots to create spots along the wiggler's neck.
Because of how a french knot works, we want to use an entry and exit point that are as close to each other as possible. The problem is that a space a stitch wide will spread the french knot out too far, ruining its shape. To mitigate this, try to exit the amigurumi in the middle of a stitch, right beside where we’ve marked. Like so:
 |
 |
Now, to create a french knot:
 |
 |
| Hold the yarn taut, then place your needle underneath it. | Wrap the yarn around three times, creating four loops on the needle. Be careful not to wrap too tightly - you want the eye of the needle to slide through these loops easily later. |
 |
 |
| Insert your needle into the marked point and push through. | Now you have a french knot. |
And those are my basic amigurumi techniques! I think there're as many different ways to crochet as there are people, so there's a whole lot of different methods out there. Obviously, choose what looks best and is easiest for you. Crochet is about what you make after all. Even if you copied every single method and followed my patterns to a T, your result will look a little bit different - and I think that is the best part of crochet. Still, I hope these techniques gathered from all across the internet will help you along on your amigurumi journey!
No comments:
Post a Comment
This is a family friendly website, so please ensure that your comments are free from vulgar or hateful language. I reserve the right to remove comments at my discretion.
Learn about how your personal information is used when commenting here.