
After finishing my stock of Galar starters for Edmonton Expo, I realized that I wanted to offer a smaller, less expensive item at my table. But instead of offering just a smaller amigurumi, why not make a little keychain?
I was originally going to make a Cutiefly keychain (and probably still will!) but after a walk with my brother and mom during which we found a Drifloon in Pokemon Go and oohed and aahed at how adorable it is, I had a really strong itch to make it!
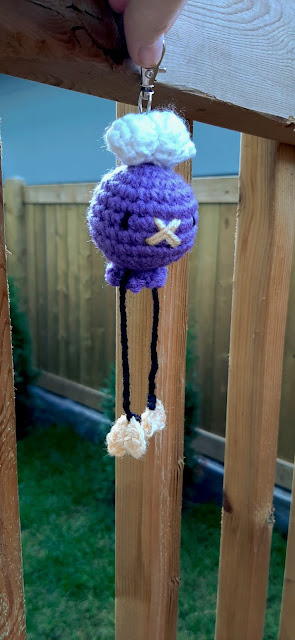
Drifloon is about 7 inches (17.8 cm) tall including its dangly little legs and key chain. I used a lobster clasp keychain because I just hate those keychains that you have to pry open!
Here's some quick guff on the ways you can use my pattern:
- do not redistribute the pattern - just link to this page
- your results are free for personal use - but I ask that you don't sell your finished product. just hand them out as gifts, ok? your friends will love you for it
With that out of the way, on to the pattern!
ad
Materials

- Size E (3.5mm) Crochet Hook
- Worsted Weight Yarn
- I used Red Heart Super Saver in:
- Soft White
- Lavender
- Cornmeal
- Black
- I used Red Heart Super Saver in:
- Yarn Needle
- Stuffing
- Keychain
Abbreviations
- ch – chain
- sc – single crochet
- hdc – half double crochet
- inc – two single crochet in same stitch
- dec – invisible decrease
- ss – slip stitch
- flo – front loop only
- sc3tog – sc 3 together, like invisible decrease but over 3 stitches
Techniques
I have a useful guide on all the different techniques I use when I make amigurumi. Obviously, you should stick with whatever techniques you are comfortable with when making amigurumi, but I still recommend checking it out if you wanna get a result as close to mine as possible!
Cloud
With white (Red Heart Super Saver Soft White).
I like to work the keychain directly into the amigurumi. To do this, I first thread the yarn through the keychain, like so:
Push the keychain far enough down the yarn that it won’t interfere. Work through the pattern as normal until you get to the point where you will be placing the keychain.
 |
 |
Rnd 1: 3 sc in magic ring. (TINY SEAM: ss to first sc, sc ONLY when starting next round). (3 sc)
Rnd 2: inc around. (6 sc)
Rnd 3: (sc, 3 hdc in next) around. (12 sts)
Rnd 4: dec around. (6 sc)
Stuff this portion firmly.
In the next round, we will be working the keychain into one of the stitches.
Rnd 5: sc, 3 hdc in next, sc.
In the next st, work a hdc up to the point where you have 3 loops on your hook (after you’ve yarned over and pulled through the stitch).

Then yarn over, grabbing the yarn from the other side of the keychain. Pull through all three loops to finish off the hdc, now with a keychain embedded in it.
 |
 |
Do 2 more hdc in that same stitch. sc, 3 hdc in last to finish up the round. (12 sts)
Rnd 6: sc around. (12 sc)
Rnd 7: dec around. (6 sc)
Stuff.
Rnd 8: sc3tog around. (2 sc)
Fasten off, leaving a long enough tail to sew the cloud onto the body. Weave the tail through the cloud until it comes out of the bottom of the sc around row, like so:

Balloon

With purple (Red Heart Super Saver Lavender).
Rnd 1: sc 6 in magic ring. (6 sc)
Rnd 2: inc around. (12 sc)
Rnd 3: (sc, inc) around. (18 sc)
Rnd 4: (sc 2, inc) around. (24 sc)
Rnd 5-8 (x4): sc around. (24 sc)
Rnd 9: (sc 2, dec) around. (18 sc)
Rnd 10: (sc, dec) around. (12 sc)
Stuff the body.
Rnd 11: dec around. (6 sc)
Now we will make the frilly bottom of the balloon. Basically, we’re working picots around.
Rnd 12: FLO: ch 4, ss in first stitch. (ss to next, ch 4, ss in same stitch) to end. ss to first stitch to complete the round.
Fasten off, leaving a long enough tail for a Weaving Finish. You will do the weaving finish on the back loops of the dec around row. Don’t worry about being exactly accurate, just make sure that everything is sealed up.
ad
Hearts

Make two. In yellow (Red Heart Super Saver Cornmeal).
In magic ring:
ch 2. hdc 2. sc. ch 1. sc. hdc 2. ch 2. ss.
Pull tight to create the heart shape. Fasten off and hide the tails.
Putting it all together
Sew the cloud on using four points on the top of the balloon, like so.

To be completely accurate, the pointed end of the cloud should be on the right (Drifloon’s left). Make sure the seam is on the back so that it doesn’t affect embroidering the face on later.
For the legs, first cut a piece of black yarn about 12 in (30 cm) long. Tie a slip knot and place on your hook as if you were to start chaining.
ss to the ch 1 portion of one of the hearts. Take your hook out and pull the yarn through. Trim the end.
Thread the other end through a yarn needle. Thread the black through the bottom of the balloon, right above the frilly bottom and parallel to the cloud.
Make a slip knot on the other end and ss to the ch 1 of the other heart. Pull the hook upwards until you create a loop, remove the hook, and slide the tail in and pull to knot. Trim the end.


Embroidering the face
First, find the stitch that’s roughly in the middle of the face. It will be about 5 rows above and below the frill and cloud respectively.

Then mark four stitches diagonally, one stitch away from the middle. These will form the X mouth. The eyes are placed two stitches to the right and left of the middle stitch.

Embroider the X using the yellow yarn. Go over it twice to make it really pop. Embroider the eyes with black yarn. You can either go up or down one stitch from the marker. I usually go up.
And you're done!

I hope you enjoyed making your little Drifloon keychain! You can check out more of my free patterns here! If you're looking specifically for Pokemon patterns, I've got a tag for that too!
No comments:
Post a Comment
This is a family friendly website, so please ensure that your comments are free from vulgar or hateful language. I reserve the right to remove comments at my discretion.
Learn about how your personal information is used when commenting here.