

It took me a while and a few more prototypes than I'm used to, but I've finally arrived at a Scorbunny amigurumi pattern that I like! This little guy features a fair bit of sewing and some fancy crochet additions, so I definitely wouldn't recommend him as a first-time amigurumi project. Still, with some patience he shouldn't give you much trouble - and who could resist those cute little eyes?!
This little guy stands approximately 7" tall and has nice legs that will dangle if he's not sitting down, though he will be thrown off balance if you sit him on the edge of something.
The pattern here is free, but if you'd rather have a printable version or if you'd like to throw a little support my way, a PDF version is available on Ravelry for the tiny sum of a single toonie!
Here's some quick guff on the ways you can use my pattern:
- do not redistribute the pattern - just link to this page
- your results are free for personal use - but I ask that you don't sell your finished product. just hand them out as gifts, ok? your friends will love you for it
With that out of the way, on to the pattern!
ad
Materials

- Size E (3.5mm) Crochet Hook
- Worsted Weight Yarn
- I used Red Heart Super Saver in:
- Soft White
- Carrot
- Cornmeal
- Black
- I used Red Heart Super Saver in:
- Yarn Needle
- Stuffing
Abbreviations
- ch – chain
- sc – single crochet
- hdc - half double crochet
- inc – two single crochet in same stitch
- dec – invisible decrease
- ss – slip stitch
- cc – colour change
- blo – back loop only
Techniques
I have a useful guide on all the different techniques I use when I make amigurumi. Obviously, you should stick with whatever techniques you are comfortable with when making amigurumi, but I still recommend checking it out if you wanna get a result as close to mine as possible!
This pattern will ask you to work invisible decreases while working in BLO. To do this, work the invisible decrease the same as your would regularly, but use the back loop instead of the front loop.
Ears
Make 2. Starting in orange (Red Heart Super Saver Carrot).
Rnd 1: sc 4 in magic ring. (TINY SEAM: ss to first sc, sc ONLY when starting next round) (4 sc)
Rnd 2: (sc, inc) around. (6 sc)
Rnd 3: (sc 2, inc) around. (8 sc)
Rnd 4: (sc 3, inc) around. (10 sc)
Rnd 5: (sc 4, inc) around. (12 sc)
Rnd 6: sc around. (12 sc)
If this is the first ear, fasten off at this point. Repeat the 6 rounds for the second ear.
If this is the second ear, cc to white (Soft White) using round beginning colour change. Here’s how we’ll connect the two ears together:
 |
 |
| Mark the first and last stitch of each ear to make the next steps easier. sc around the first ear. | ss to the first stitch of the second ear, then sc in that same stitch. sc around this ear. |
 |
 |
| sc around this ear. ss to the first stitch of the first ear. We will continue on in rounds from this point. | Using a small bit of orange yarn, tie a knot through the small ss points in the last orange row of each ear. This closes up a small gap that would have been present after stuffing.The end will be hidden inside the amigurumi. |
Rnd 7: sc around. Be careful not to sc into the two ss between the ears. (24 sc)
Rnd 8: sc 5, dec, sc 10, dec, sc 5. (22 sc)
Rnd 9: sc 16, ch 4, skip 2, sc 4. (24 sc)
Rnd 10:(sc 2, dec) x4, sc 3 in ch 4 space, sc 2, dec. (18 sc)
Rnd 11: (sc, dec) around. (12 sc)
Now we’ll work on closing up the hole in the ear with a cute little tuft.

Attach your yarn to the first stitch of the 2 skipped sc.
Rnd 1: sc in this stitch, then work another 5 sc around the hole evenly. (2 sc in top, 4 sc in bottom). ss to first stitch. (6 sc)
Rnd 2: sc around. Fasten off. (6 sc)
To seal up this ear tuft, we’ll be using a seal I’m gonna call “Tuft Seal.” It's basically a variation on the Weaving Finish. We’ll be using it later as well.
 |
 |
| Insert your needle into the front loops of the first two stitches. Pull tight. Repeat around. | Pull tight so that the seal "puckers." |
 |
|
| Tie a knot through the tip of the tuft and pull tight. We'll deal with hiding the yarn tail after stuffing. |
Now stuff the ears. You don’t need to stuff the ears all that heavily because they are supposed to be a little flat, and we don’t want the weight to overwhelm the head and neck later. To make sure some stuffing gets into the tuft, use something like a pencil to push it in. Hide the tuft tail by running it through the stuffing.
With the ears done, let’s continue on to the head!

Head
Continuing from ears:
Rnd 1: inc around. (24 sc)
Rnd 2: (sc 3, inc) around. (30 sc)
Rnd 3: sc around. (30 sc)
Rnd 4: sc 7, ch 7, skip 4, sc 11, ch 7, skip 4, sc 4. (36 sc)
Rnd 5: sc 4, dec, sc, sc 6 in ch space, sc 2, dec, sc 4, dec, sc, sc 6 in ch space, sc 2, dec. (30 sc)
Rnd 6: sc around. (30 sc)
Rnd 7: (sc 3, dec) around. (24 sc)
Rnd 8: (sc 2, dec) around. (18 sc)
Rnd 9: (sc, dec) around. (12 sc)
Now we’ll add the cheek tufts and stuff.

Rnd 1: Attach yarn into the left side of the hole, in the space between the skipped stitches and the sc worked into the ch space. sc in this same place, then work 11 sc evenly around the hole (4 in the top skipped sts, 7 along the bottom) then ss to the first sc. (12 sc)
Rnd 2: sc around. (12 sc)
Rnd 3: Now sc 1, skip 4, then sc. It’ll end up looking like this:

Work sc in the remaining 6, then ss to first. (8 sc)
Rnd 4: dec around. (4 sc)
Fasten off and do the tuft seal from before.
With the remaining tail, weave with your needle until it comes out into the point where you skipped. (i.e: if there were a triangle between the two tufts, at the point of that triangle)
 |
 |
Tie a knot in this space. This will help keep the two points of this tuft distinct.
Finally, close up the 4 skipped sc by sewing through each pair with a whip stitch. Like this.

Tie a knot in the tip, then wait until the head is stuffed to hide the tail.
Repeat this process with the other cheek tuft. Afterwards, stuff the head and hide the tails.
Head done! You’ve made it through the most complicated part of the amigurumi!

Body

Rnd 1: dec around. (6 sc)
Rnd 2-3 (x2): sc around. (6 sc)
Rnd 4: inc around. (12 sc)
Rnd 5: (sc, inc) around.(18 sc)
At this point, stuff the neck. You want to make sure the neck can support the head, so make sure there is a lot of stuffing jammed in there.
Rnd 6-8 (x3): sc around. (18 sc)
Rnd 9: (sc 2, inc) around. (24 sc)
Rnd 10-12 (x3): sc around. (24 sc)
Rnd 13: (sc 2, dec) around. (18 sc)
Rnd 14: BLO: (sc, dec) around. (12 sc)
Stuff the body.
Rnd 15: dec around. (6 sc)
Fasten off. Weaving Finish to close up the body.
Collar

Starting in orange.
Rnd 1: sc 6 in magic circle. (6 sc)
Rnd 2-7 (x7): sc around. (6 sc)
Fasten off with an extra long tail for sewing (you’ll be sewing all along the bottom AND top of the collar, so keep that in mind). Weaving Finish. Weave the tail so that it comes out of the bottom of the tip of the collar for later sewing.
Arms

Make 2. Starting in white.
Rnd 1: ch 4, sc in 2nd ch from hook. sc, 3 sc in last ch, rotate, sc, 2 sc in last. ss to first. (8 sc)
Rnd 2-4 (x3): sc around. (8 sc)
Rnd 5: dec, sc 2, dec, sc 2. (6 sc)
Rnd 6-7 (x2): sc around. (6 sc)
Fasten off, leaving a tail for sewing.
Stuff the arms with a small ball of stuffing at the very end. There should be no stuffing at the opening. The arms should have a teardrop shape.
Tail

Starting in white.
Rnd 1: sc 6 in magic circle. (6 sc)
Rnd 2: inc around. (12 sc)
Rnd 3: sc around. (12 sc)
Rnd 4: dec around. (6 sc)
Fasten off, leaving a tail for sewing. We will worry about stuffing the tail as we’re sewing it on to the body.
Feet
Make 2. Starting in white.
Rnd 1: ch 8, sc in 2nd ch from hook. sc 5, cc to orange, sc 3 in last, cc to white, rotate, sc 5, sc 2 in last. (16 sc)
Rnd 2: inc, sc 5, cc to orange, 3 inc, cc to white, sc 5, 2 inc. (22 sc)
Rnd 3: inc, sc 6, cc to orange, (inc, sc) x3, cc to white, sc 5, (inc, sc) x2. (28 sc)
Rnd 4: BLO: sc 8, cc to orange, sc 9, cc to white, sc 11. (28 sc)
Rnd 5: BLO: dec, sc 6, cc to orange, (dec, sc) x3, cc to white, sc 5, (dec, sc) x2. (22 sc)
Rnd 6: dec, sc 5, cc to orange, 3 dec, cc to white and drop orange, sc 5, 2 dec. (16 sc)
Rnd 7: dec, sc 4, sc3tog, sc 5, dec. (12 sc)
Stuff the foot. Weaving Finish to close the foot up.
After finishing both feet,continue on to the Legs.
Legs
We will be working 8 sc in an oval into the foot on the side where we sealed up. Because it’s mostly guesswork, just try to keep it as even as you can.
 |
 |
| Use 3 sc from the BLO row, 1 sc up from each end, then 3 sc across the top. | Attach your yarn into the right-most stitch of the 3 BLO, then work 3 sc along. |
 |
 |
| Work 1 sc up. It might take some digging and finagling, but you'll get it. | Work 3 sc along the top, then 1 sc between the top and bottom. ss to the first sc worked. Now you’ve got the base of the leg that we’ll be working around for the next few rounds. |
Rnd 2-3 (x2): sc around. (8 sc)
Rnd 4: (sc 2, dec) around. (6 sc)
Rnd 5-6 (x2): sc around. (6 sc)
Fasten off, leaving a tail for sewing. Like with the arms, stuff only the bottom of the leg, leaving no stuffing at the top.

Now the legs are done! All that's left is to crochet the details that will be sewn on.
ad
Inside Ears

Make 2. In yellow (Red Hear Super Saver Cornmeal).
Row 1: ch 2, sc in 2nd ch from hook. (1 sc)
Row 2: ch 1, turn. sc. (1 sc)
Row 3: ch 1, turn. inc. (2 sc)
Row 4: ch 1, turn. inc twice. (4 sc)
Row 5: ch 1, turn. sc2tog twice. (2 sc)
Row 6: ch 1, turn. sc2tog. (1 sc)
Row 7: ch 1, turn. sc. (1 sc)
Fasten off, leaving a tail for sewing.
Bandages

Make 3. In yellow.
ch 6. hdc in 3rd ch from hook. hdc to end.
Fasten off with tail for sewing.
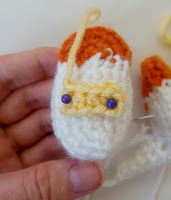
Eyes

Note: there are a lot of colour changes here worked into a tight space. Just do your best and take it slow. Marking the first ch might help.
Make 2. Starting in white.
ch 2. sc in 2nd ch from hook. cc to black. 1 sc in same space. cc to orange. 3 sc in same space. cc to black. 1 sc in same space. ss to first. Fasten off with tail for sewing.
Last Detail on Feet
Before we sew on all the parts and details, we need to affix 2 of the bandages to the feet.
The bottom of the bandage should roughly line up 4 rows up from the bottom of the foot – right above the where the first round ends. The sides of the bandages are about 1 sc away from the BLO row. The top will be about 2 rows below the orange foot tip.
Sewing on Parts
First, the collar.
It should wedge in nicely between the increase in the body (“shoulders”) and the bottom of the head. The ends of the collar line up roughly with where the cheek tufts stick out. There are 3 sc of neck exposed in the front.

Sew along both the bottom and top of the collar. This helps keep the head steady.
 |
 |
From the bottom, line up two stitches approximately in the middle of the head. On either side of those stitches, mark a space of 3 stitches. This is where the legs will be sewn on. Sew into the back loop only round.
The tail starts 4 stitches away from the end of the leg and is 2 stitches wide. It may be hard to count the stitches on one side because of the seam distortion. The tail rises up one stitch, which will give you a roughly-square area 6 stitches around. Sew the bottom of the tail on the BLO round and proceed from there. Before closing up completely, stuff the tail so that it looks plump and cute! Something like a pencil should help you jam it all in there.
The inside edge of the arms lines up with the outside stitches of the legs. That should give you 7 stitches of space between them. The arms start two rows down from where the collar was attached. It should take 3 stitches across the arms.
Sewing on Details

The inside of the ears start on the row above the row with dec leading to the head. The top of the ear reaches 2 rows into the orange. Position the insides so that the side with the higher point faces inward. It should end up right at the transition between orange and white, 1 sc away each from where the ears meet. The other side of the insides will be 1-2 sc away from the outer edge of the ears.
Attach the bandage about 2 rows down from where the ears meet the head. You’ll need the eyes to tell what’s the middle of the face: the outer edge of each eye should line up roughly with where the cheek tufts were attached. The top of the eyes should be one row lower than the top of the bandage. The bandage will end up being tucked comfortably between the eyes.
Embroidering Nose and Mouth
 |
 |
Each side of the nose is roughly 1 sc from the eyes, and the space between the top and bottom covers 2 rows. I used three lines to make the nose look full. Try to get the top of the nose as close to the bandage as possible.
Each space in the w of the mouth is 1 sc wide. It zigzags across 1 row.
And...you're done!!!

I hope you enjoyed making your little Scorbunny buddy! You can check out more of my free patterns here! If you're looking specifically for Pokemon patterns, I've got a tag for that too! I've also created a Sobble pattern and a Grookey pattern if your Scorbunny would like a friend.

No comments:
Post a Comment
This is a family friendly website, so please ensure that your comments are free from vulgar or hateful language. I reserve the right to remove comments at my discretion.
Learn about how your personal information is used when commenting here.